When a storm hits your property, knowing what comes next can help you recover faster and avoid costly mistakes. The storm restoration process involves five main steps: emergency response and damage assessment, water and debris removal, structural and exterior repairs, interior repairs and cleanup, and final inspection with insurance coordination. Each step plays a key role in bringing your home or business back to its pre-damage condition.
The process may seem complicated at first, but understanding what happens at each stage helps you make better decisions and work more effectively with restoration professionals. Time matters after storm damage, especially when water intrusion or structural issues are involved.
This guide walks you through each phase of storm restoration so you know exactly what to expect.
Here's what you need to know:
- Understanding the importance of storm restoration
- Step 1: Emergency response and damage assessment
- Step 2: Water and debris removal
- Step 3: Structural and exterior repairs
- Step 4: Interior repairs and cleanup
- Step 5: Final inspection and insurance coordination
Keep reading! You'll learn how professionals assess damage, protect your property from further harm, complete necessary repairs, and help you navigate insurance requirements.
Understanding the importance of storm restoration
Storm restoration protects your home from additional harm and helps you recover faster after severe weather strikes. Quick action on repairs keeps your family safe and strengthens your position when filing insurance claims.
Protecting your property from further damage
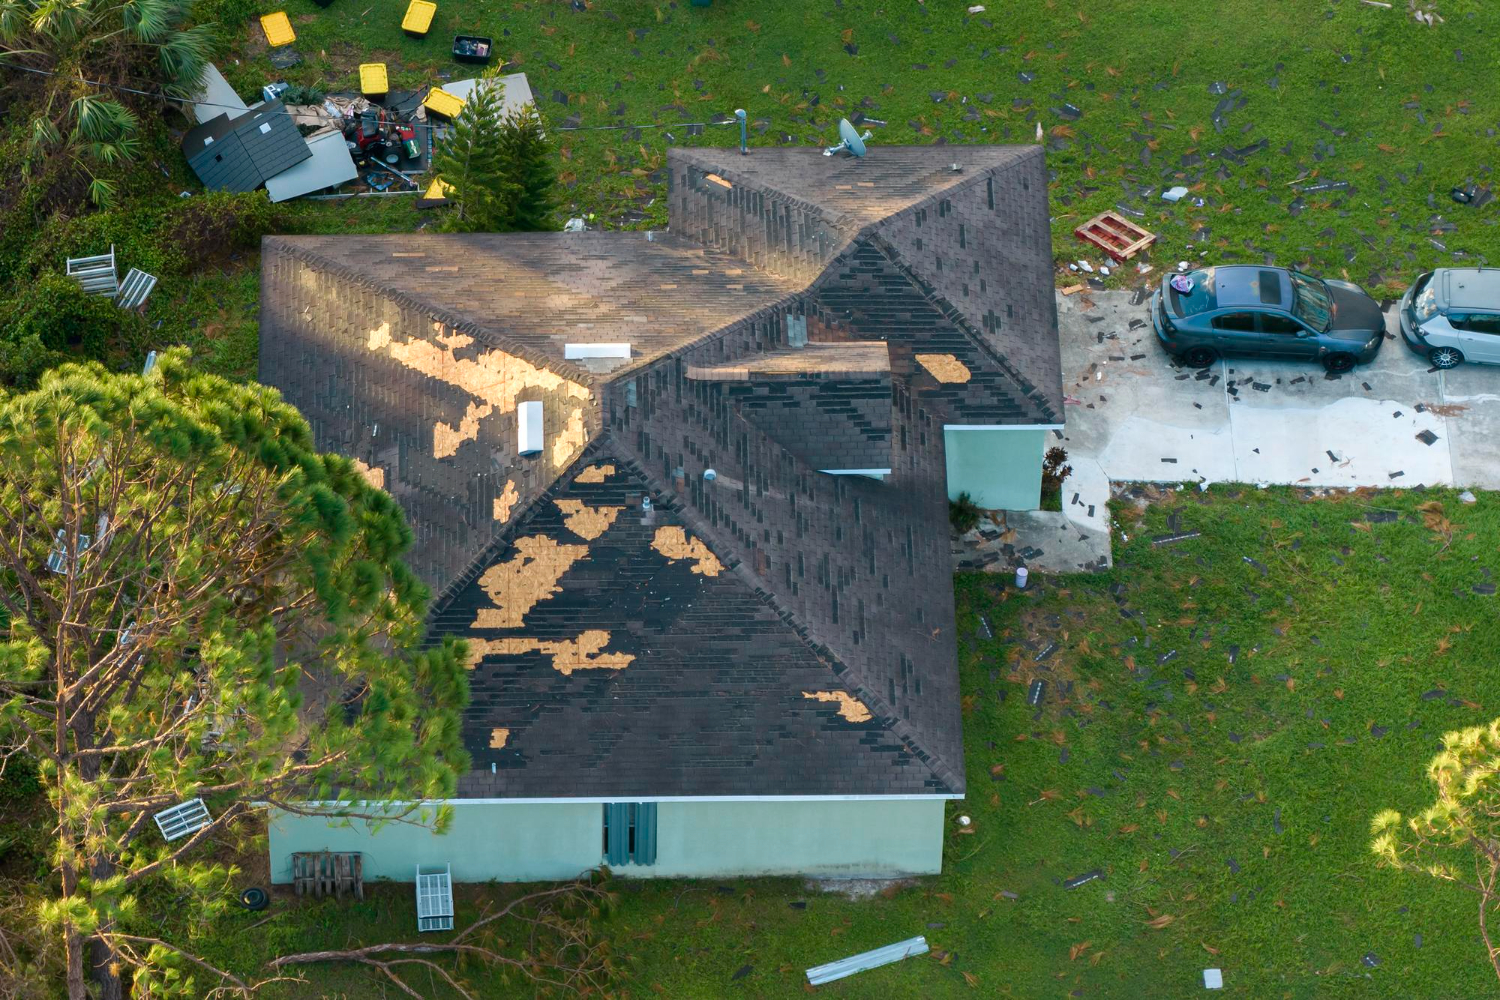
Storm damage rarely stays contained to the initial impact area. A small roof leak can spread water into your walls and ceilings, creating bigger problems over time.
When you delay repairs, rain and wind enter through damaged areas. This leads to water damage in your insulation, wood framing, and electrical systems. Mold can start growing within 24 to 48 hours in wet conditions.
Professional storm restoration secures your property right away. Contractors install tarps on damaged roofs, board up broken windows, and remove standing water. These emergency steps stop the damage from getting worse while you plan full repairs.
Your property value drops when storm damage goes untreated. Wood rots, metal rusts, and structural problems become more expensive to fix.
Minimizing safety hazards after a storm
Storms create dangerous conditions that put your family at risk. Broken glass, exposed nails, and unstable structures can cause injuries if left unaddressed.
Electrical hazards are especially serious after storm damage. Water near power lines, outlets, or electrical panels can cause shocks or fires. Damaged gas lines also pose explosion risks that need immediate attention.
According to the U.S. Centers for Disease Control and Prevention (CDC), floodwater that enters a home after a storm can carry sewage, hazardous chemicals, and other contaminants, and electrical equipment that has been exposed to water must be fully dried and inspected by a certified professional before being returned to service.
Weakened roofs and walls can collapse without warning. Heavy rain or wind after the initial storm may be enough to bring down compromised structures. Storm restoration teams identify these risks during their assessment and stabilize dangerous areas.
Standing water breeds bacteria and creates slipping hazards. Contaminated floodwater can carry sewage, chemicals, and other harmful materials into your home. Professional water extraction and sanitization protect your health.
Proper restoration eliminates these threats systematically through property storm recovery steps that prioritize safety.
How timely restoration impacts insurance claims
Insurance companies expect you to prevent additional damage after a storm. Your policy likely includes a clause requiring prompt action to protect your property.
Documentation is critical for your claim. Storm restoration professionals photograph all damage before starting repairs. They create detailed reports that show what the storm destroyed versus what existed beforehand. This evidence supports your insurance claim and prevents disputes.
Per the U.S. Federal Emergency Management Agency (FEMA), homeowners should photograph and document all storm-related damage before beginning any cleanup or repairs, retaining material samples and all repair receipts, as this evidence is essential for supporting insurance claims and may directly affect reimbursement outcomes.
Most insurance policies have strict deadlines for filing claims. Missing these windows can result in denied coverage or reduced payouts. Starting restoration quickly ensures you meet all required timelines.
Delays also complicate the claims process. Insurance adjusters struggle to determine storm damage from subsequent deterioration when you wait too long. Your claim becomes harder to prove and may face challenges during review.
Working with experienced restoration contractors helps you navigate insurance requirements. They understand what documentation adjusters need and can communicate directly with your insurance company throughout the process.
Step 1: Emergency response and damage assessment
The first 24 hours after a storm require quick action to secure your property and document what happened. Professional restoration teams focus on safety, protection, and gathering evidence for your insurance claim.
Initial on-site inspection
When you contact emergency storm restoration services, a trained team arrives to evaluate your property's condition. They check for immediate hazards like exposed electrical wiring, gas leaks, structural instability, and standing water that could cause additional problems.
The inspection covers all affected areas of your home. Your roof, walls, windows, and foundation get examined for visible damage. The team looks for water intrusion points, broken glass, and compromised structural elements that need urgent attention.
Safety is the top priority during this phase. Professionals identify which areas of your home are safe to enter and which spaces need to stay off-limits. They mark dangerous zones and inform you about specific risks found on your property.
Temporary board up and roof protection
After the inspection, crews install emergency protection to prevent further damage. Broken windows get covered with plywood boards that seal out rain, wind, and unwanted entry. Damaged doors receive similar treatment to secure your home.
Roof protection involves placing heavy-duty tarps over holes, missing shingles, or damaged sections. These tarps get fastened securely to withstand additional weather until permanent repairs begin. This step stops water from entering your home and causing mold growth or interior damage.
Emergency measures also include water extraction if flooding occurred. Quick removal of standing water protects your floors, belongings, and prevents mold from developing within 24-48 hours.
Documenting damage for insurance
Your restoration team photographs and records every damaged area before starting any work. These photos serve as critical evidence for your insurance claim. They capture the full extent of damage from multiple angles with detailed close-ups.
The documentation process includes written descriptions of what was damaged, measurements of affected areas, and notes about materials that need replacement. This information gets organized into a comprehensive report for your insurance adjuster.
You should take your own photos and videos as backup documentation. Make a list of damaged personal items with their approximate value. Keep all receipts related to emergency repairs or temporary housing expenses.
Step 2: Water and debris removal
After the initial damage assessment, your restoration team tackles two critical tasks: removing all standing water and clearing debris from your property. These steps must happen quickly to prevent further damage and create a safe environment for repairs.
Extracting standing water and moisture
Your restoration team uses wet/dry vacuums and portable water extractors to remove standing water from your floors, carpets, and other surfaces. This process typically starts within the first 24 to 48 hours after storm damage occurs.
Once the visible water is gone, technicians deploy air movers and commercial dehumidifiers to address hidden moisture. Air movers push moisture from carpets, floors, and building materials into the air. The dehumidifiers then pull that moisture out of the air to dry your property completely.
Technicians use moisture meters and thermal imaging cameras to find water in walls, ceilings, and other hard-to-see areas. They monitor moisture levels daily until everything reaches normal readings. This thorough drying process usually takes three to five days depending on the extent of damage.
Clearing fallen trees and debris
Your property needs all storm debris removed before repairs can begin. This includes fallen trees, broken branches, damaged building materials, destroyed furniture, and other items that cannot be saved.
Professional crews use chainsaws, wood chippers, and heavy equipment to handle large trees and branches safely. They haul away all debris in trucks or dumpsters. Your team removes damaged drywall, insulation, flooring, and other building materials that got wet or destroyed.
The crew also clears gutters, downspouts, and drainage systems of leaves and debris. Clean drainage prevents water from pooling around your foundation during future storms.
Preventing mold and structural issues
Mold can start growing within 24 to 48 hours after water damage occurs. Your restoration team applies antimicrobial treatments to affected areas during the cleanup process. These treatments kill existing mold spores and prevent new growth.
According to the U.S. Environmental Protection Agency (EPA), wet or damp building materials must be dried within 24 to 48 hours following water intrusion to prevent mold from taking hold — and because mold gradually destroys the materials it grows on, delays in the drying process can result in structural deterioration that far exceeds the cost of the original storm damage.
Technicians inspect your property's structural elements like beams, joists, and load-bearing walls for damage. Water weakens wood and can compromise your building's stability. They identify which structural components need repair or replacement.
Your team also treats surfaces with cleaning agents and sanitizers to remove contaminants that floodwater may have brought into your home. This step protects your health and prepares surfaces for reconstruction work.
Step 3: Structural and exterior repairs
Once your property is secured and documented, repairs focus on restoring the building's outer shell and structural integrity. These repairs protect your home or business from weather, prevent further damage, and restore the property's appearance.
Roof, siding, and gutter restoration
Your roof is the first line of defense against weather damage. Storm damage often includes missing shingles, torn underlayment, or holes that allow water into your attic and walls. Contractors will remove damaged materials and install new roofing that matches your existing system.
Siding repairs address cracks, dents, or missing panels that expose your walls to moisture. Wood siding may need replacement if it's split or rotting. Vinyl or metal siding can often be replaced panel by panel without redoing entire walls.
Gutters and downspouts need attention too. Bent or detached gutters can't direct water away from your foundation properly. This leads to basement flooding and foundation problems down the road.
Both residential storm restoration and commercial storm restoration follow similar repair processes. Commercial properties may have larger roof areas or specialized siding materials that require different techniques.
Window and door repairs or replacements
Broken windows and damaged doors create security risks and energy loss. Cracked glass needs immediate replacement to prevent water intrusion and keep your property secure.
Window frames damaged by impact or water may need full replacement rather than just new glass. Warped frames won't seal properly and will continue letting moisture inside.
Door repairs include fixing damaged frames, replacing broken locks, and ensuring proper weather sealing. Entry doors that no longer close tightly waste energy and compromise security. Garage doors often sustain significant storm damage and may need track realignment or complete replacement.
Storm-rated windows and doors offer better protection for future weather events. These upgrades may qualify for insurance discounts in high-risk areas.
Fence and outdoor structure restoration
Fences take heavy damage from wind and falling debris. Wood fences may have broken posts, missing boards, or entire sections knocked down. Metal fences can bend or separate at connection points.
Repairs start with assessing which posts need replacement versus reinforcement. Damaged sections get rebuilt using materials that match your existing fence style.
Pergolas, gazebos, and sheds often suffer structural damage during storms. These structures may need new support beams, roof repairs, or complete rebuilding depending on damage severity. Check that foundations remain level and intact before rebuilding.
Your contractor should inspect all outdoor structures for hidden damage. What looks like surface damage may indicate deeper structural problems that need attention.
Step 4: Interior repairs and cleanup
Once structural and exterior work is complete, focus shifts to restoring your home's interior spaces. This phase addresses water damage, ensures all systems work safely, and completes the cosmetic repairs that make your property livable again.
Drying and restoring flooring and walls
Water infiltration from storms affects floors and walls within hours. You need to dry these areas within 24-48 hours to prevent mold growth and structural deterioration.
Professional restoration teams use industrial dehumidifiers and air movers to remove moisture from affected materials. They monitor humidity levels with specialized meters to confirm complete drying. Drywall that stayed wet for extended periods often requires replacement rather than drying.
Hardwood floors may warp or buckle from water exposure. Some floors can be saved through careful drying and refinishing, while others need complete replacement. Carpet padding almost always requires removal after water damage, even if the carpet itself can be salvaged.
Wall cavities need inspection for hidden moisture and insulation damage. Wet insulation loses its effectiveness and promotes mold growth, so replacement becomes necessary. Baseboards and trim pieces often swell or separate and may need reinstallation or replacement once walls dry completely.
Electrical and plumbing safety checks
Storm damage creates serious electrical and plumbing hazards inside your home. Licensed professionals must inspect these systems before you resume normal use.
Electrical inspections identify water-damaged wiring, outlets, and circuit breakers. Water exposure corrodes connections and creates fire risks. Your electrician will test all circuits, replace damaged components, and verify proper grounding.
Plumbing systems suffer from displaced pipes, broken connections, and contamination issues. A plumber will check for leaks, test water pressure, and ensure drainage systems function properly. They'll also inspect water heaters and other appliances for damage.
Replacing drywall and insulation
Water-damaged materials:
- Drywall with visible staining or softness
- Insulation that absorbed moisture
- Wall sections with mold growth
- Baseboards showing swelling or separation
Contractors cut out damaged drywall sections and install new panels. They match existing textures and prepare surfaces for paint. New insulation goes in wall cavities before drywall installation to maintain energy efficiency.
Painting, flooring, and finishing touches
Final repairs transform your restored structure back into a comfortable living space. This work includes both functional repairs and aesthetic improvements.
Paint application requires properly prepared surfaces. Contractors prime new drywall and repaired sections before applying finish coats. They match existing colors or give you the option to update your interior design.
Flooring installation comes after all overhead work finishes. Options include replacement of original materials or upgrades to more storm-resistant products. Installers ensure proper subfloor preparation and moisture barriers where needed.
Trim work, door installation, and fixture replacement complete the interior restoration. Workers reinstall or replace baseboards, crown molding, door frames, and window casings. Cabinet repairs or replacements happen during this phase if kitchen or bathroom areas sustained damage.
Step 5: Final inspection and insurance coordination
Once repairs are complete, a thorough inspection confirms that all work meets professional standards and local building requirements. This stage also involves close coordination with your insurance company to finalize your claim and ensure proper reimbursement.
Ensuring all repairs meet local codes
Your restoration company should conduct a detailed inspection of all completed work before considering the project finished. This inspection verifies that repairs comply with local building codes, safety regulations, and industry standards. Many areas require permits for roof replacements, structural repairs, or electrical work related to storm damage.
A licensed inspector will check key areas like roofing materials, flashing installation, structural integrity, and water drainage systems. They look for proper ventilation, correct shingle alignment, and secure fastening methods. Any issues found during this inspection must be corrected before the work can be approved.
You should request copies of all permits and inspection certificates for your records. These documents prove that repairs were done correctly and legally, which protects your home's value and your insurance coverage.
Working with insurance adjusters
Your insurance adjuster will schedule a final visit to review the completed repairs and compare them against the original damage assessment. This meeting is your opportunity to walk through the property together and confirm that all approved work has been finished.
Be present during this final inspection whenever possible. Point out specific repairs and ask questions about any differences between the initial estimate and final costs. Adjusters need to verify that the scope of work matches what was approved in your claim.
If additional damage was discovered during repairs, your contractor should have documented it with photos and written notes. Present this evidence to your adjuster immediately so they can process a supplemental claim if needed.
Providing documentation for claim approval
Complete documentation is required for your insurance company to process final payment. Your restoration contractor should provide a detailed invoice listing all materials used, labor costs, and any additional repairs that were necessary.
Collect these essential documents:
- Final invoice with itemized costs
- Before and after photos of all repair areas
- Permit copies and inspection certificates
- Material receipts and warranties
- Change order forms for any additional work
Your insurance company typically requires 7 to 14 business days to review final documentation and issue payment. Keep copies of everything you submit in case questions arise later. Submit all paperwork through your adjuster's preferred method, whether that's email, an online portal, or physical mail.
Conclusion
Storm restoration requires careful planning and professional help to get your property back to normal. Each step in the process plays an important role in keeping your home safe and functional after severe weather hits.
You need to act quickly when storm damage occurs. The faster you start the restoration process, the less damage your property will suffer. Water damage and structural problems get worse over time if you wait.
Working with experienced restoration professionals makes the entire process smoother. They know how to handle everything from initial damage assessment to final repairs. You can trust them to identify hidden problems that you might miss on your own.
Your property deserves proper restoration after storm damage. Taking shortcuts or trying to handle major repairs yourself often leads to bigger problems later. Professional teams have the right tools, knowledge, and experience to do the job correctly.
The restoration process takes time, but patience pays off. You'll end up with a property that's safe, functional, and protected against future storms. Stay involved throughout the process and ask questions when you need clarification. Your active participation helps ensure the best possible outcome for your home or business.
Contact Michaelis Corp today to get a professional assessment of your storm damage and start the restoration process before further deterioration drives up repair costs.

.avif)