Repairing damaged roof flashing quickly prevents leaks and saves homeowners from expensive water damage repairs down the road.
Roof flashing protects your home by directing water away from vulnerable areas where different parts of your roof meet. When flashing fails, water can seep into your home and cause serious damage to walls, ceilings, and the structure itself.
Most homeowners don't think about roof flashing until a problem appears. Small gaps or cracks in flashing can turn into major leaks during heavy rain or snow. Learning to spot the warning signs early helps protect your home and your wallet.
This guide explains what roof flashing does, how to identify damage, and what the repair process involves. Below, we’ll walk through each important aspect:
- What is roof flashing and why is it important?
- Signs your roof flashing needs repair
- Common causes of roof flashing damage
- How roof flashing repair is performed
- Benefits of timely roof flashing repair
- DIY vs professional roof flashing repair
- How to maintain roof flashing for longevity
- Why choose Michaelis Corp for roof flashing repair
Readers will learn about common causes of flashing problems, the benefits of fixing issues promptly, and whether to tackle repairs themselves or call a professional.
What is roof flashing and why is it important?
Roof flashing acts as a waterproof barrier at vulnerable joints and transitions on a roof. It directs water away from areas where two surfaces meet, preventing leaks that could damage the home's interior and structure.
How flashing protects against water intrusion
Flashing creates a water-tight seal at points where the roof plane changes or meets another surface. Rain naturally flows toward seams, edges, and penetrations in the roof. Without flashing, water seeps under shingles and into the underlayment.
The metal or synthetic material bends to fit snugly against both surfaces at an angle. This design channels water down and away from the joint. Water runs along the flashing surface until it reaches the shingles, where it continues flowing off the roof.
Properly installed flashing accounts for how roofing materials expand and contract with temperature changes. When installers leave adequate room for movement, the flashing maintains its seal even as materials shift. Gaps that form from improper installation allow water to penetrate and cause rot, mold, and structural damage.
Common areas where flashing is installed
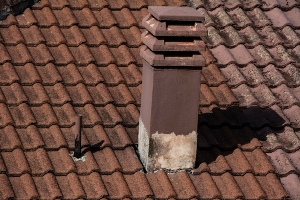
Chimneys require flashing around all four sides where the brick or stone meets the roof surface. Step flashing runs along the sides while counter flashing covers the top and bottom edges.
Roof valleys where two slopes meet need valley flashing to handle the concentrated water flow. Skylights and dormer windows get flashing around their entire perimeter. Vent pipes use boot flashing that wraps around the pipe opening.
Wall and roof intersections receive step flashing that tucks under the siding. Roof edges sometimes use drip edge flashing to protect the fascia board from water damage.
Materials used for durable roof flashing
Aluminum flashing costs less than other metals and resists rust in most climates. It bends easily during installation but can corrode in coastal areas with salt exposure.
Copper flashing lasts 50 years or more and develops a protective green patina over time. The material costs more upfront but requires minimal maintenance. Steel flashing with a galvanized coating provides strength and durability at a moderate price point.
Synthetic rubber and plastic flashings work well around pipes and irregular shapes. Lead flashing molds to complex angles but environmental concerns have reduced its use. The choice depends on budget, climate conditions, and the expected lifespan of the roof system.
Signs your roof flashing needs repair
Damaged flashing shows specific warning signs that homeowners can spot during regular inspections. Catching these problems early helps prevent extensive water damage and costly home roof repair projects.
Water stains on ceilings or walls
Water stains appear as discolored patches on interior surfaces, typically brown or yellow in color. These marks often show up near roof intersections where flashing protects vulnerable areas.
The stains start small but grow larger as water continues to seep through damaged flashing. Fresh water damage looks darker and feels damp to the touch. Older stains appear faded but indicate ongoing problems that need attention.
Ceiling stains near chimneys, skylights, or roof valleys point directly to flashing issues. Wall stains in upper floors or attic spaces also signal flashing failure. Even small discolorations require inspection since water damage spreads quickly through building materials.
Leaks around chimneys, vents, or skylights
Active leaks around roof penetrations mean the flashing has failed at these critical points. Water enters during rain or snow melt, dripping into living spaces or pooling in attic areas.
Chimney leaks often appear where the structure meets the roofline. The flashing at this junction must create a watertight seal against both the masonry and roofing material. When this seal breaks, water flows directly into the home.
According to Northwestern University’s Facilities Design Guidelines, counterflashing must be inserted into reglets or receivers and tightly fitted to the base flashing, critical at chimney interfaces to keep water out.
Vent pipe flashing uses rubber boots that crack over time from sun exposure. Skylights need flashing on all four sides, and failure at any point allows water entry. These roof leak repair situations worsen quickly and can damage insulation, wood framing, and electrical systems.
Rusted, cracked, or loose flashing
Rust forms on metal flashing when the protective coating wears away. Small rust spots expand into holes that let water pass through. Galvanized steel and aluminum flashing both develop corrosion problems over time.
Cracks develop from thermal expansion and contraction as temperatures change. The metal bends and flexes with the roof, eventually forming splits along bends and edges. Wind pressure and aging materials make cracking worse.
Loose flashing pulls away from the roof surface or wall connection. The sealant deteriorates, nails work free, and gaps open up. Visible separation between flashing and adjacent materials indicates immediate repair needs.
Missing or damaged flashing sections
Complete flashing sections sometimes blow off during storms or fall away as fasteners fail. Missing pieces leave roof joints completely exposed to water intrusion.
Bent or torn flashing no longer directs water properly. Physical damage from falling branches, foot traffic during maintenance, or improper installation creates openings for leaks. Dented areas collect water instead of shedding it away from vulnerable spots.
Step flashing along walls can lose individual pieces without removing the entire run. Each missing segment creates a point where water enters the roof system. Valley flashing damage is particularly serious since these areas channel large volumes of water.
Common causes of roof flashing damage
Roof flashing breaks down for several reasons that range from natural aging to poor workmanship. Most damage happens gradually over time, but some problems can develop quickly after severe weather or improper repairs.
Weather-related wear and tear
Sun exposure causes flashing materials to expand and contract repeatedly throughout the day. This constant movement weakens the metal over time and can create small gaps where water enters.
Heavy rain and wind push water into areas that weren't designed to handle direct exposure. Wind-driven rain can force moisture under flashing that would normally stay dry during calm weather.
Temperature changes affect different materials at different rates. When flashing expands and contracts at a different speed than the roofing material it's attached to, the seal between them breaks down. This creates openings for water to seep through.
Hail and strong storms can dent or crack flashing directly. Even small dents can collect water and rust through faster than flat surfaces. UV rays also make some sealants brittle and cause them to crack or peel away from the metal.
Poor installation or low-quality materials
Improper installation is one of the top reasons flashing fails early. When installers don't overlap pieces correctly or use too few fasteners, water finds its way through gaps.
Common installation mistakes include:
- Not sealing nail holes properly
- Using incompatible metals that corrode when they touch
- Cutting flashing too short to provide adequate coverage
- Failing to extend flashing far enough under shingles
Cheap materials save money upfront but cost more in the long run. Thin gauge metal bends easily and develops holes faster than thicker options. Low-quality sealants dry out and crack within a few years instead of lasting decades.
Some installers skip important steps to finish jobs faster. They might not clean surfaces before applying new flashing or use the wrong type of fasteners for the material.
Roof settling or movement
Houses shift and settle naturally as foundations adjust to soil conditions. This movement can pull flashing away from its original position and break the waterproof seal.
The wood structure under a roof expands when it absorbs moisture and shrinks when it dries out. These changes in the roof deck can loosen fasteners holding flashing in place.
Structural shifts put extra stress on areas where flashing connects different roof sections. Valleys and joints are especially vulnerable because they experience the most movement. When one section of roof moves independently from another, it can tear flashing or create gaps.
Older homes experience more settling issues than newer construction. The flashing may have been installed correctly at first but fails as the building continues to shift over decades.
Damage from debris or ice buildup
Fallen branches and wind-blown debris can tear or dent flashing on impact. Even small twigs and leaves cause problems when they pile up and trap moisture against the metal.
Ice dams form when heat escapes through the roof and melts snow. The water runs down to the cold eaves and refreezes. This ice buildup can push under flashing and pry it away from the roof surface.
Moss and algae growth holds moisture against flashing and speeds up corrosion. These organisms grow in shaded areas where flashing stays damp for long periods. The constant moisture exposure eats through protective coatings on the metal.
Gutters clogged with leaves force water to back up under roof edges. This overflow reaches areas that flashing was never designed to protect from standing water.
How roof flashing repair is performed
Roof flashing repair involves a systematic process of identifying damage, removing compromised materials, installing new components, and creating watertight seals. Each step requires attention to detail to ensure the flashing redirects water properly and prevents future leaks.
Inspecting and assessing damaged flashing
The repair process starts with a thorough examination of all flashing areas on the roof. A technician checks around chimneys, vents, skylights, and valleys for visible signs of damage like rust, cracks, or gaps.
They look for lifted edges where the flashing has pulled away from the roof surface. Bent or warped sections indicate structural problems that need addressing. Water stains on ceilings or walls inside the home often point to specific flashing failures.
The inspector evaluates whether the damage requires a simple repair or complete flashing replacement. Minor issues like small gaps can be fixed with sealant. Extensive corrosion or multiple breaks mean the entire section needs removal and replacement.
Taking measurements of damaged areas helps determine the amount of new material needed. Photos document the current condition for reference during repairs.
Removing and replacing old or damaged materials
Once the assessment is complete, workers carefully remove the compromised flashing without damaging surrounding shingles or roofing materials. They use flat pry bars and utility knives to loosen old sealant and pull out nails.
The removal process varies based on the flashing type:
- Step flashing: Each piece must be removed individually as shingles are lifted
- Valley flashing: Requires removing shingles on both sides of the valley
- Chimney flashing: Involves detaching both base and counter flashing pieces
- Vent pipe boots: The old boot pulls off after loosening the collar seal
New flashing gets cut to the proper dimensions using tin snips. The material must overlap correctly with adjacent pieces to channel water downward. Workers position each section and secure it with roofing nails placed in appropriate locations.
Sealing joints and edges to prevent leaks
After installing new flashing, technicians apply roofing cement or specialized sealant to all joints and edges. This step creates a waterproof barrier at every connection point.
They run a continuous bead of sealant along the top edge where flashing meets vertical surfaces like walls or chimneys. The bottom edges get sealed where the flashing overlaps with shingles. Any nail heads receive a dab of sealant to prevent water penetration.
Gutter flashing repair requires extra attention at the connection between the roof edge and gutter system. Sealant fills gaps that could let water slip behind the gutters and damage fascia boards.
Workers smooth out excess sealant to avoid creating dams that trap water. The finished seal should be even and complete without thin spots.
Ensuring proper integration with roofing and gutters
The final step confirms that repaired flashing works correctly with the rest of the roofing system. Technicians verify that water flows smoothly from the roof surface onto the flashing and into gutters or off the roof edge.
They check that shingles overlap the flashing properly without creating gaps. Each piece must layer correctly so water cannot travel upward or sideways beneath the materials. The flashing should sit flat against all surfaces without buckling or leaving spaces.
Gutter connections receive special attention to ensure water transfers cleanly from the roof into the drainage system. Any areas where flashing meets gutters must have proper slope and clearance. Testing with a water hose reveals whether the repair effectively redirects moisture away from vulnerable areas.
Benefits of timely roof flashing repair
Fixing roof flashing problems quickly protects homes from water damage, saves money on repairs, and keeps roofs working properly for many years.
Prevents water damage to walls, ceilings, and insulation
Damaged flashing creates openings where water can enter a home during rain or snow. Water that gets past broken flashing flows into walls and ceilings, causing stains, peeling paint, and rotting wood. Insulation absorbs this water and loses its ability to regulate temperature, which increases energy bills.
Homeowners who repair flashing damage right away stop water before it spreads through their home. A small leak from faulty flashing can travel along rafters and beams, showing up far from the actual problem spot. This makes finding the source harder and more expensive to fix later.
Timely repairs keep walls dry and insulation effective. Water damage repair costs range from hundreds to thousands of dollars depending on how far moisture has spread. Fixing flashing when problems first appear prevents these larger expenses.
Extends the life of your roof
Roof flashing protects vulnerable areas where water naturally collects. When flashing works correctly, it directs water away from joints, seams, and openings. Broken or missing flashing lets water sit in these spots, which speeds up deterioration of shingles, underlayment, and roof decking.
Metal flashing lasts 20 to 30 years when properly maintained. Repairs done early prevent small issues like loose sections or minor rust from becoming complete failures. Temperature changes cause roofing materials to expand and contract throughout the year. Flashing must move with these changes without creating gaps.
Homeowners who maintain their flashing get more years from their entire roof system. A roof that stays dry performs better and requires fewer emergency repairs. Regular flashing maintenance costs much less than replacing water-damaged roof sections or installing a new roof years earlier than expected.
Reduces risk of mold and structural issues
Moisture from leaking flashing creates ideal conditions for mold growth. Mold appears in attics, wall cavities, and ceiling spaces where homeowners cannot easily see it. Some mold types cause health problems including breathing issues and allergic reactions.
Water that enters through damaged flashing weakens structural components over time. Wood framing absorbs moisture and begins to rot, losing its strength and stability. Metal connectors and fasteners rust when exposed to constant moisture. These problems threaten the safety of a home's structure.
Quick flashing repairs keep moisture out and prevent mold from starting. Mold remediation services cost between $500 and $6,000 depending on the affected area size. Structural repairs for rotted beams and damaged framing cost even more. Fixing flashing problems immediately stops these issues before they begin.
Maintains home value and safety
Buyers and home inspectors check roofs carefully during real estate transactions. Visible water stains, damaged flashing, or signs of leaks reduce a home's selling price. Properties with well-maintained roofs and flashing sell faster and for higher prices than homes with water damage.
Water leaks create safety hazards beyond property damage. Wet ceiling materials become heavy and can collapse. Water near electrical wiring increases the risk of shorts and fires. Ice dams form more easily when flashing fails, creating dangerous conditions around a home's exterior.
Homeowners who keep flashing in good condition protect their investment. Insurance companies may deny claims for damage that resulted from poor maintenance. Regular flashing repairs demonstrate responsible home ownership and prevent claim disputes.
DIY vs professional roof flashing repair
Roof flashing repair requires precise skills and knowledge to prevent water damage. Improper installation can lead to costly structural problems, code violations, and voided warranties.
Risks of improper repair or sealing
Working with roof flashing involves specific techniques that many homeowners lack. A DIY repair might look complete on the surface, but hidden gaps or incorrect overlap patterns allow water to seep through.
Common mistakes include using the wrong sealant type, which breaks down under UV exposure or temperature changes. Many people apply too little caulk or place it in the wrong locations, leaving vulnerable spots where water enters.
Critical DIY errors include:
- Incorrect cutting angles on step flashing pieces
- Failing to extend flashing far enough under shingles
- Using roofing cement as a primary seal instead of proper mechanical fastening
- Installing flashing over damaged or rotted wood without addressing the underlying problem
Falls from roofs send thousands of people to emergency rooms each year. Working on sloped surfaces near chimney or vent flashing puts inexperienced workers at serious risk. Professional roofers use safety equipment and training that most homeowners don't have.
Incorrectly sealed flashing fails within months rather than lasting decades. Water infiltration damages insulation, framing, and interior finishes long before visible signs appear inside the home.
Ensuring long-term protection with professional methods
Professional roofers use proven installation sequences that DIY guides often skip. They know which materials work together and how different flashing types interact with various roofing materials.
Contractors install underlayment correctly before placing flashing, creating layered protection. They understand how water flows across different roof planes and position flashing to direct moisture away from vulnerable areas.
Professional advantages include:
- Access to commercial-grade materials not sold in retail stores
- Specialized tools for bending and cutting metal flashing precisely
- Knowledge of manufacturer specifications for each product
- Experience with regional weather patterns and appropriate material selection
Licensed roofers carry insurance that covers damage during repairs. They warranty their work, providing recourse if problems develop. This protection doesn't exist with DIY repairs.
Professionals complete flashing repairs in hours rather than days. They identify related problems during inspection that an untrained eye misses, preventing future emergencies.
Compliance with building codes and material warranties
Local building codes specify flashing requirements for different roof penetrations. These regulations address minimum overlap distances, fastener types, and material specifications. Violations create liability issues when selling a home or filing insurance claims.
FEMA advises inspecting flashing for staining or damage and using flashing that meets or exceeds local building-code requirements in high-wind areas to mitigate water intrusion.
Many jurisdictions require permits for roof work. Inspectors check flashing installations to verify code compliance. DIY work often proceeds without permits, creating legal problems and potential fines.
Code requirements typically cover:
- Metal gauge thickness for different applications
- Ice and water shield placement in cold climates
- Kickout flashing at roof-to-wall intersections
- Proper integration with house wrap and exterior sheathing
Manufacturer warranties become void when homeowners install products incorrectly. Roofing material companies require professional installation following their written specifications. A rejected warranty claim costs thousands in premature replacement expenses.
Professional roofers stay current with code changes and manufacturer updates. They document their work with photos and material receipts, establishing a clear record for future reference. This documentation proves valuable during home sales or insurance disputes.
How to maintain roof flashing for longevity
Proper roof maintenance requires attention to flashing at vulnerable points where water can enter. Simple preventive steps help flashing last longer and protect the home from leaks and water damage.
Regular inspections, especially after storms
Homeowners should inspect roof flashing at least twice per year, ideally in spring and fall. These checks help catch small problems before they turn into major leaks.
According to Western Kentucky University’s Roof Maintenance Plan, facilities teams walk roofs quarterly specifically to inspect and repair flashings and penetrations, showing that frequent checks prevent small defects from turning into leaks.
Storm damage poses a serious risk to flashing. High winds can lift or bend metal pieces, while hail may create dents or cracks. Heavy rain often reveals existing weak spots through visible water stains or drips inside the home.
Key areas to examine include chimneys, skylights, vent pipes, and roof valleys. Look for rust spots, gaps between the flashing and roof surface, or pieces that appear loose or bent. Check for missing sealant or caulk that has cracked and dried out.
Keep debris off roof valleys and joints
Leaves, branches, and other debris collect in roof valleys and around flashing points. This buildup traps moisture against the metal and accelerates rust and corrosion.
Regular debris removal prevents premature flashing failure. Homeowners should clear valleys and joints every few months, more often if large trees hang over the roof. A roof rake or soft broom works well for this task without damaging the flashing.
Standing water from blocked areas weakens sealant and creates entry points for leaks. Pine needles prove particularly problematic as they wedge into small gaps and hold water like a sponge.
Clean gutters and downspouts to prevent water backup
Clogged gutters force water to back up under roof edges and around flashing. This excess water pressure pushes past protective barriers and into the home.
Clean gutters at least twice yearly, or quarterly in areas with many trees. Remove all leaves, twigs, and sediment that block water flow. Check that downspouts drain freely and direct water away from the foundation.
Water backup often goes unnoticed until damage occurs. Signs include water stains on fascia boards, drips behind gutters, or visible overflow during rain. Proper gutter function keeps water moving off the roof as designed.
Promptly address minor damage before it worsens
Small flashing issues grow into expensive repairs when ignored. A tiny gap or loose edge lets water seep behind roofing materials and rot the deck below.
Common early problems include cracked caulk, small rust spots, or slightly lifted edges. These repairs often need only fresh sealant or new fasteners. Waiting allows water infiltration that damages insulation, framing, and interior finishes.
Homeowners should fix minor issues within weeks of discovery. Larger repairs require professional help, but catching problems early reduces both cost and extent of work needed. Metal flashing lasts 20-30 years with proper care, but neglect cuts this lifespan significantly.
Why choose Michaelis Corp for roof flashing repair
Michaelis Corp brings nearly four decades of roofing expertise to every flashing repair project. Their team combines specialized knowledge with quality materials and a commitment to customer satisfaction that has earned them a strong reputation in the Indianapolis area.
Experienced roofing specialists
Michaelis Corp has served residential and commercial clients since 1986. This family-owned company has spent decades mastering all aspects of roofing systems, including the critical details of flashing installation and repair.
The company's technicians understand how flashing interacts with different roofing materials and weather conditions. They know where leaks typically start and how to prevent future problems. This experience matters because flashing repairs require precision work that inexperienced contractors often get wrong.
Their systematic inspection process examines both visible and hidden areas of roofing systems. The team checks all flashing types, including step flashing along walls, valley flashing between roof planes, and chimney flashing. They also inspect the condition of underlying structures that support the flashing.
Michaelis Corp works on various property types and roof designs. This broad experience helps their specialists handle complex flashing situations that standard contractors might struggle with.
Advanced materials and repair techniques
The company uses quality materials designed to withstand harsh weather conditions. They select flashing materials based on the specific roof type and exposure level.
Michaelis Corp applies proper installation methods that ensure watertight seals. Their technicians follow manufacturer specifications and industry best practices for each repair. They understand the importance of correct overlap, proper fastening, and adequate sealant application.
The team addresses underlying issues during repairs, not just surface problems. If water damage has affected the roof deck or surrounding materials, they handle those repairs as part of a complete solution. This thorough approach prevents recurring leaks that result from incomplete fixes.
Fast, reliable service with long-lasting results
Michaelis Corp responds quickly to repair requests. They understand that flashing leaks can cause extensive damage if left unaddressed.
The company completes repairs efficiently without sacrificing quality. Their experienced crews work systematically to minimize disruption to the property. They bring the right tools and materials to finish jobs in fewer visits.
Michaelis Corp stands behind their repair work. Their focus on doing the job right the first time reduces callbacks and gives property owners confidence in the repairs. Previous customers have noted the team's professional approach and pleasant demeanor throughout projects.
Local expertise and proven customer satisfaction
Based in Indianapolis, Michaelis Corp understands local weather patterns and building requirements. They know how freeze-thaw cycles, heavy storms, and seasonal temperature changes affect flashing performance in the region.
The company has built a strong local reputation through consistent service quality. They handle everything from small spot repairs to complete roof restorations. Their experience with insurance claims helps property owners navigate the restoration process more smoothly.
Michaelis Corp also provides related services like storm damage repair, water mitigation, and foundation work. This comprehensive capability means they can address any secondary issues discovered during flashing repairs.
Conclusion
Roof flashing repair protects homes from water damage and maintains the roofing system's integrity. Regular inspections help catch problems early before they turn into expensive repairs.
Homeowners should check their flashing at least twice a year for signs of damage. Look for rust, cracks, loose sections, or gaps where water might enter. Common problem areas include chimneys, vents, skylights, and roof valleys.
Minor repairs like resealing small gaps might be manageable for experienced DIYers. However, professionals ensure the work meets building codes and manufacturer specifications. They also have the right materials and safety equipment to complete the job correctly.
Proper flashing repair extends the roof's lifespan and prevents interior water damage. The investment in timely repairs saves money compared to fixing structural damage from leaks. Homeowners who stay proactive with maintenance protect their property value and avoid emergency situations during storms.
Quality flashing repair requires attention to detail and proper installation techniques. Whether handling minor fixes or calling professionals for major work, addressing flashing issues promptly keeps homes dry and secure.
Schedule a roof flashing inspection and leak test with Michaelis Corp to remove failed sections, install new step/counter/valley flashing to code, and reseal penetrations before the next storm.

.avif)