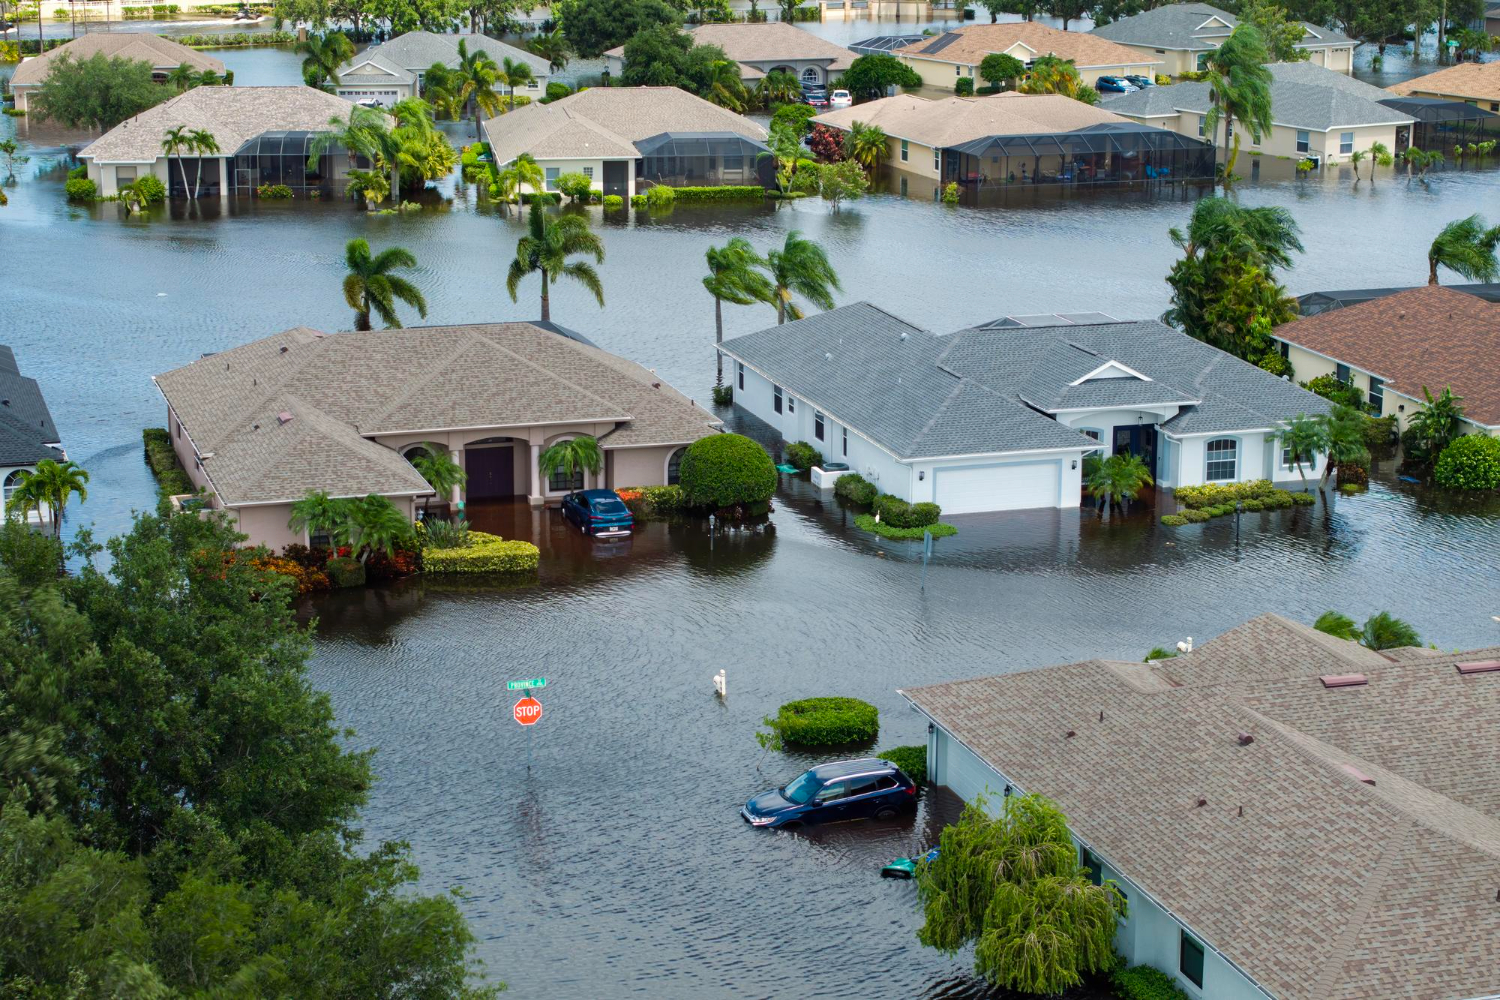
Flood damage can turn a home into a soggy mess within hours. Water seeps into walls, floors, and belongings, creating problems that go far beyond what the eye can see.
Flood damage restoration involves removing water, drying out the space, cleaning up contamination, and fixing or replacing damaged materials to bring a home back to safe, normal conditions. This process requires quick action to prevent mold growth and structural damage. Most homeowners face costs around $3,000 for typical restoration work, though the final price depends on how much water entered the home and what got damaged.
The key to successful flood restoration lies in knowing what steps to take first, when to call professionals, and how to work with insurance companies. Homeowners who understand the drying process, available services, and cost factors can make better decisions during a stressful time.
In this article, you’ll learn how flood damage restoration works—from first response to full property recovery.
Here’s what you need to know.
First steps in flood damage restoration within 24 hours
- Drying your home fast without creating bigger problems
- Flood damage restoration services and what they include
- Costs, insurance, and paperwork made simple
- DIY or professional help: how to choose with confidence
Keep reading! Quick action in the first 24 hours makes the biggest difference in saving a home and belongings.
First steps in flood damage restoration within 24 hours
Quick action in the first day after flooding prevents major structural damage and stops mold from growing. Homeowners must focus on safety, stopping more water from entering, and saving what they can while documenting everything for insurance.
Shut off power and water safely before you touch anything
Turn off electricity at the main breaker before entering flooded areas. Water and electricity create deadly hazards that can kill instantly.
Check if the electrical panel sits in a dry location. If water surrounds the panel, call an electrician instead of trying to shut it off.
Shut off the main water supply to prevent more flooding. The main valve usually sits near where water enters the home from the street.
Wear rubber boots and gloves when walking through standing water. Even clean water can contain dangerous bacteria after sitting for hours.
Call the gas company if you smell gas or suspect line damage. Never try to turn gas valves yourself during flood conditions.
Wait for professionals to check electrical systems before turning power back on. Hidden water damage can cause fires or electrocution later.
Stop the source and document every room for faster claims
Find and stop the water source immediately to prevent more damage. Look for burst pipes, roof leaks, or failed appliances causing the flooding.
Turn off water to specific fixtures if you cannot reach the main shutoff. Most toilets and sinks have individual valves nearby.
Take photos and videos of every damaged room before moving anything. Insurance companies need proof of damage for claims processing.
Document water levels by taking pictures with measuring tape or rulers. Show how high water reached on walls and furniture.
Make a detailed list of damaged items with their approximate value. Include furniture, electronics, clothing, and personal belongings in your inventory.
Take close-up photos of expensive items and any serial numbers or brand labels. This documentation speeds up insurance settlements significantly.
Call your insurance company within 24 hours to report the claim. Many policies require quick notification to cover water damage cleanup costs.
What to keep and what to toss to speed water damage cleanup
Remove items that can be saved to dry areas immediately. Books, important papers, and electronics may survive if dried quickly enough.
Porous materials like carpet padding, insulation, and drywall usually need replacement after flood exposure. These items hold moisture and grow mold fast.
Furniture made of solid wood can often be restored with professional help. Particle board and laminated pieces typically cannot be saved after soaking.
Keep and Dry
Throw Away
Solid wood furniture
Carpet padding
Important documents
Soaked insulation
Electronics (if dried fast)
Particle board furniture
Non-porous items
Contaminated food
Discard all food that touched floodwater or lost refrigeration. Contaminated food can cause serious illness even after cooking.
Move salvageable items to the highest, driest area of the home. Use fans and dehumidifiers to start the drying process right away.
Sort items by priority, saving irreplaceable photos and documents first. Professional water damage cleanup services can help restore valuable items using special drying techniques.
Drying your home fast without creating bigger problems
Quick action prevents mold growth and structural damage, but rushing the process incorrectly can trap moisture in hidden areas. The right sequence of water removal, airflow management, and moisture control protects your home while speeding recovery.
How to remove standing water and start airflow the right way
Remove standing water first before starting any drying equipment. Pumps work best for deep water, while wet vacuums handle smaller amounts.
Start with the lowest areas of your home. Water flows downward and pools in basements and crawl spaces first.
Water removal order:
- Deep standing water (pumps)
- Surface water (wet vacuums)
- Saturated materials (extraction tools)
Open windows and doors only after removing standing water. This prevents humidity from spreading to dry areas of your home.
Position fans to create airflow patterns that move moisture outside. Place exhaust fans in windows pointing outward. Set up intake fans on the opposite side of the room.
Avoid pointing fans directly at wet materials too early. This can drive moisture deeper into walls and floors instead of pulling it out.
When to use dehumidifiers versus heat for quicker dry times
Dehumidifiers work best in closed spaces with high humidity levels above 60%. They pull moisture from the air without raising temperature.
Use dehumidifiers when:
- Indoor humidity stays high even with fans running
- Outside air is humid or rainy
- Drying sensitive materials like hardwood floors
Heat speeds drying but can cause wood to crack and warp. It also increases humidity if not combined with proper ventilation.
Use heat when:
- Outside air is dry and cool
- You have strong ventilation systems running
- Materials can handle temperature changes
Temperature guidelines:
- Keep indoor temperature between 70-80°F
- Never exceed 90°F for extended periods
- Monitor material expansion and cracking
Combine both methods carefully. Run dehumidifiers with gentle heat for fastest results without damage.
Avoiding hidden mold while materials are still wet
Mold starts growing within 24-48 hours in wet conditions. Check hidden areas where moisture gets trapped during water damage restoration. According to the U.S. Environmental Protection Agency (EPA), mold can start growing within 24 to 48 hours if wet materials are not properly dried.
High-risk mold areas:
- Behind baseboards and trim
- Inside wall cavities
- Under flooring materials
- Around plumbing fixtures
Remove wet insulation immediately. It cannot dry properly and creates perfect mold conditions inside walls.
Pull back carpets and padding within 24 hours. Check the subfloor underneath for moisture and damage.
Use moisture meters to find hidden water. Check readings daily in walls, floors, and ceilings near the flood area.
Document moisture levels with photos and notes. This helps track drying progress and spot problem areas early.
Remove materials that stay wet after 48 hours. Drywall, wood, and fabric that cannot dry quickly often need replacement to prevent mold growth.
Flood damage restoration services and what they include
Professional restoration companies follow a set process to return homes to their original condition. This work involves removing moisture, cleaning salvageable items, and making necessary repairs.
Moisture mapping, demo, and sanitation explained in plain terms
Moisture mapping uses special tools to find all wet areas in a home. Technicians use infrared cameras and moisture meters to check walls, floors, and ceilings. This step finds hidden water that can cause mold later.
Demo work removes materials that cannot be saved. Workers tear out wet drywall, insulation, and flooring that stayed wet too long. They also remove baseboards and trim that soaked up water.
Materials commonly removed include:
- Carpet and padding
- Drywall below the flood line
- Insulation in walls and crawl spaces
- Cabinets that warped or swelled
Sanitation comes after demo work. Teams clean all surfaces with special products that kill germs and bacteria. They also treat areas to prevent mold growth.
Air movers and dehumidifiers run for several days. These machines pull moisture from the air and materials. The drying process usually takes 3-5 days.
Contents cleaning and pack-out when items are worth saving
Restoration teams sort through damaged belongings to see what can be saved. They move salvageable items to a safe, dry area or off-site facility. This process is called pack-out.
Items that can often be restored:
- Furniture made of solid wood
- Important documents and photos
- Electronics (if dried quickly)
- Clothing and fabrics
- Books and paper items
Professional cleaning removes dirt, debris, and contamination from these items. Special equipment cleans different types of materials. Ultrasonic baths work well for small items like jewelry.
Workers catalog each item with photos and descriptions. This creates a record for insurance claims. Items stay in climate-controlled storage until the home is ready.
Some belongings cannot be saved, especially those exposed to contaminated floodwater. Porous materials like mattresses and stuffed animals usually get thrown away.
Repairs that bring your home back to pre-loss condition
Reconstruction begins after the home is completely dry and clean. Workers replace all materials that were removed during demo. They install new drywall, insulation, and flooring.
Electrical and plumbing systems often need repairs or replacement. Water can damage wiring and corrode pipes. Licensed contractors handle these specialized repairs.
Common reconstruction work includes:
- Installing new drywall and primer
- Replacing flooring materials
- Painting walls and ceilings
- Installing new trim and baseboards
The final step involves matching the new work to the existing home. Workers use the same paint colors, flooring types, and fixture styles when possible. This makes repairs blend in seamlessly.
Quality restoration companies guarantee their work for at least one year. They also provide certificates showing the home meets safety standards for moisture levels.
Costs, insurance, and paperwork made simple
Most flood restoration projects cost between $3-15 per square foot, with insurance coverage varying significantly based on policy type and damage source. Proper documentation and understanding the difference between water damage and flood damage helps homeowners navigate claims more effectively.
Typical cost ranges for water damage restoration
Water damage restoration costs depend on several key factors. The source of water, affected area size, and damage severity all impact final prices.
Basic restoration typically runs $3-7 per square foot. This covers simple drying, cleaning, and minor repairs to drywall or flooring.
Moderate damage ranges from $7-12 per square foot. This includes replacing damaged materials, treating mold growth, and structural repairs.
Severe damage can reach $12-15 per square foot or higher. Extensive structural work, complete room rebuilding, and contaminated water cleanup fall into this range.
Water extraction and structural drying typically cost between $4 and $12 per square foot, according to cost data from HomeGuide.
Damage Level
Cost Per Sq Ft
Typical Services
Basic
$3-7
Drying, cleaning, minor repairs
Moderate
$7-12
Material replacement, mold treatment
Severe
$12-15+
Structural work, complete rebuilding
The type of water also affects costs. Clean water from burst pipes costs less to remediate than sewage backups or floodwater.
Remediation vs restoration and what your policy usually covers
Remediation focuses on stopping further damage and removing water. Restoration rebuilds and repairs damaged areas back to pre-loss condition.
Most homeowners insurance covers sudden and accidental water damage. This includes burst pipes, roof leaks, and appliance malfunctions.
Standard policies typically do not cover flood damage from natural disasters. Homeowners need separate flood insurance through FEMA's National Flood Insurance Program for this protection.
Insurance companies often distinguish between:
- Water damage: Covered under standard policies
- Flood damage: Requires separate flood insurance
- Gradual damage: Usually excluded from coverage
Coverage limitations may apply to certain areas. Basements, crawl spaces, and finished areas below ground often have restricted coverage amounts.
Some policies cover both remediation and restoration costs. Others may only pay for emergency water removal and basic repairs.
The insurance checklist that speeds approvals and payments
Document everything immediately after discovering water damage. Take photos and videos of all affected areas before starting cleanup.
Essential documentation includes:
- Photos of damage from multiple angles
- Video walkthrough of affected areas
- List of damaged personal property
- Receipts for emergency services
- Weather reports (for flood claims)
Contact your insurance company within 24-48 hours of discovering damage. Many policies require prompt notification to maintain coverage.
Keep detailed records of all communications with insurance representatives. Write down names, dates, and claim numbers for future reference.
Obtain written estimates from licensed restoration contractors. Insurance companies often require multiple bids for larger claims.
Save all receipts for temporary housing, emergency repairs, and additional living expenses. Many policies reimburse these costs during restoration.
Use water damage restoration software or apps when available. Some insurance companies provide tools that help calculate costs and generate required paperwork automatically.
DIY or professional help: how to choose with confidence
Making the right choice between DIY cleanup and professional restoration depends on the damage severity, hidden health risks, and time-sensitive factors. Most homeowners can handle minor water issues, but serious flooding requires expert equipment and expertise.
When a homeowner can handle cleanup and when not to
Small water leaks and minor flooding often fall within a homeowner's ability to manage. DIY cleanup works best when water affects less than 10 square feet and comes from clean sources like broken pipes or appliance leaks.
Safe DIY situations include:
- Standing water less than 2 inches deep
- Clean water sources only
- No electrical hazards present
- Damage contained to one small room
Homeowners should never attempt DIY cleanup in dangerous situations. Call professionals immediately when dealing with sewage backups, contaminated floodwater, or structural damage.
Professional help is required for:
- Category 2 or 3 water (gray or black water)
- Water damage affecting multiple rooms
- Standing water above 2 inches
- Electrical systems exposed to water
- Mold growth visible or suspected
The 24-48 hour window matters greatly. Water spreads quickly through walls, floors, and furniture. Professional crews have industrial pumps and dehumidifiers that work much faster than household equipment.
Health risks after a flood you can't see or smell
Floodwater carries dangerous bacteria, viruses, and chemicals that pose serious health threats. These contaminants remain active even after water dries, creating long-term risks for families.
Hidden contaminants include:
- E. coli and salmonella bacteria
- Hepatitis A virus
- Chemical runoff from roads and lawns
- Raw sewage components
Mold growth starts within 24-48 hours in damp conditions. Many mold types grow behind walls and under flooring where homeowners cannot see them. Some mold species release toxins that cause respiratory problems and other health issues.
Professional restoration teams use moisture meters to find hidden water pockets. They also have specialized equipment to test air quality and detect mold growth in concealed areas.
Children, elderly family members, and people with breathing problems face higher risks from flood contamination. Professional cleanup includes proper disinfection and air filtration that DIY methods cannot match.
24/7 local help available: Michaelis crews can begin water removal within hours
Michaelis restoration teams respond to emergency calls around the clock, seven days per week. Fast response prevents additional damage and reduces total restoration costs for homeowners.
Professional crews arrive with truck-mounted water extraction equipment that removes thousands of gallons per hour. This industrial equipment works 50 times faster than shop vacuums or rental pumps.
Emergency services include:
- Water extraction and removal
- Structural drying with commercial dehumidifiers
- Moisture monitoring and testing
- Emergency board-up services
- Content protection and cleaning
Time matters critically in flood situations. Each hour of delay allows water to spread deeper into building materials and furnishings. Professional response within 2-4 hours can save flooring, drywall, and personal belongings that would otherwise require replacement.
Michaelis crews coordinate directly with insurance companies to document damage and streamline the claims process. This professional documentation often results in better insurance settlements for homeowners.
Conclusion
Flood damage restoration requires quick action and professional help. Homeowners who act fast can save thousands of dollars in repairs.
The restoration process follows clear steps. Water removal, drying, cleaning, and repairs all work together to restore damaged properties.
Professional restoration teams have the right tools and training. They can handle water extraction, moisture detection, and structural repairs safely.
Documentation helps with insurance claims. Homeowners should take photos and keep records of all damage and repair work.
The timeline depends on damage severity. Minor flooding may take days while major damage can require weeks or months.
Prevention helps reduce future risks. Installing flood barriers, improving drainage, and regular maintenance protect homes from water damage.
Working with experienced professionals makes the process smoother. They handle complex repairs and work directly with insurance companies.
Recovery takes time but proper restoration returns homes to safe, livable conditions. Following the right steps helps families get back to normal life faster.
Contact a certified water damage restoration team today to start drying and repairs before mold and structural damage set in.

.avif)