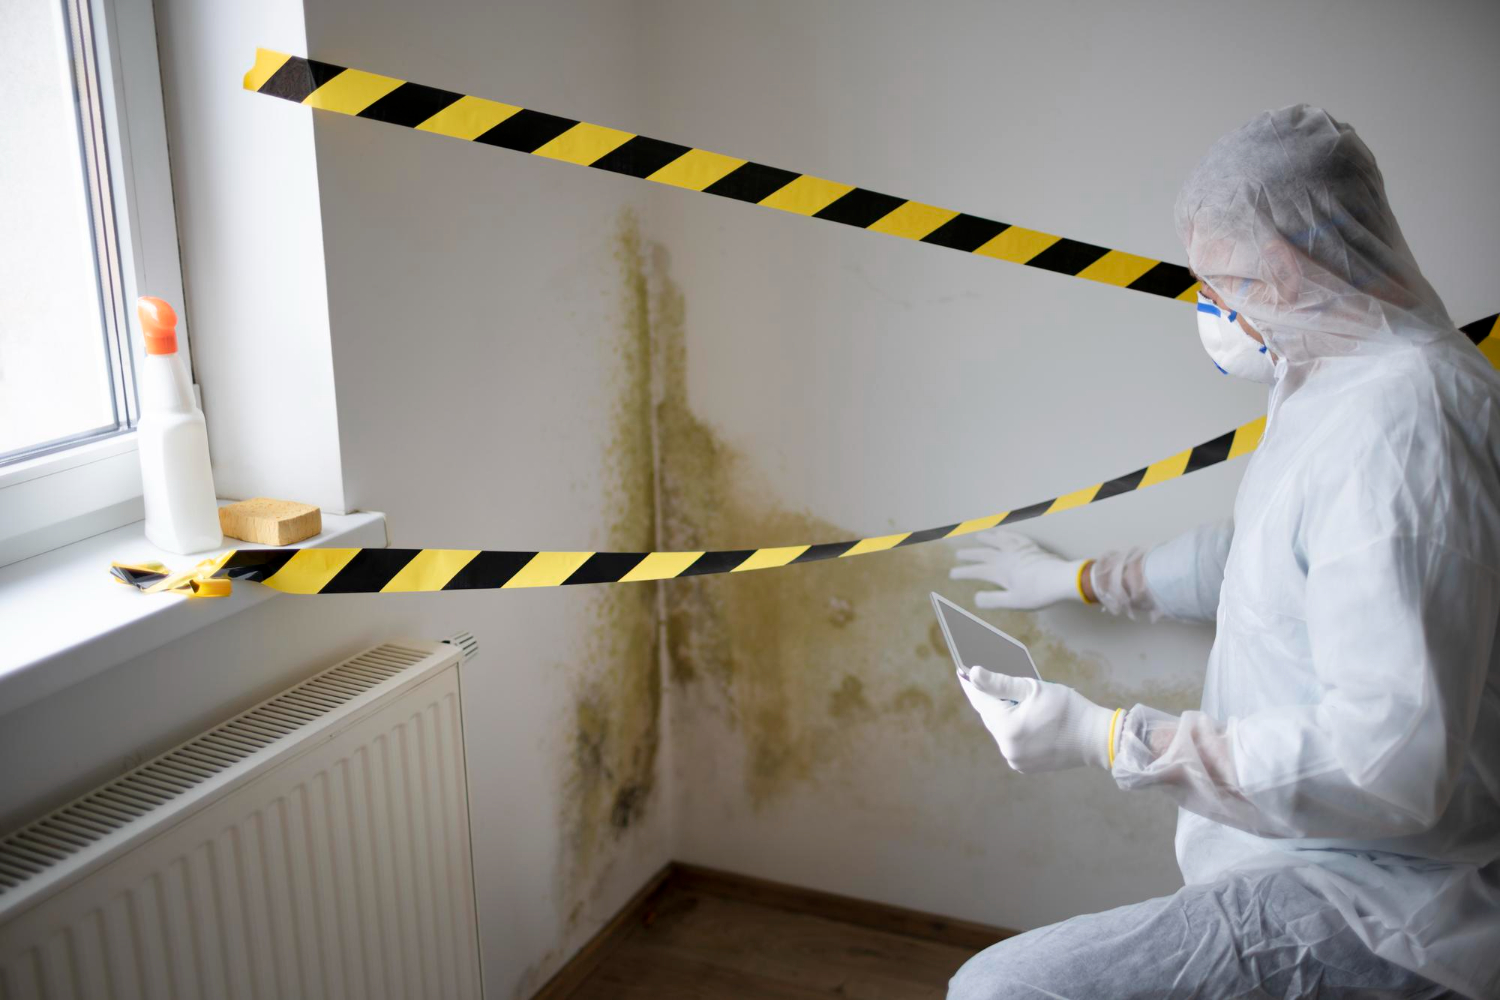
Mold can grow silently in homes for months without being noticed, causing health problems and property damage. Many homeowners only discover mold issues when they smell musty odors or develop unexplained respiratory symptoms. A professional mold inspection identifies hidden mold growth, finds moisture sources, and determines if remediation is needed to protect both health and property.
Most homes contain some level of background mold, but the key question is whether excess moisture has created a serious problem. Inspectors look beyond visible mold to find water damage and conditions that allow mold to thrive. They use specialized tools and testing methods to detect issues that homeowners often miss.
From knowing when testing is necessary to learning about costs and prevention strategies, a thorough mold inspection provides the foundation for maintaining a healthy living environment.
In this guide, you’ll learn how mold inspection works—when to test, how to spot warning signs, what it costs, and what to expect from professional services.
Let’s break it down so you can plan your next steps with confidence.
- What a mold inspection covers and when you need testing
- Step-by-step: What happens during a mold inspection
- Mold inspection cost and timing
- Can you do a mold inspection yourself?
- After the inspection: removal and prevention
Understanding the inspection process helps property owners make informed decisions about their indoor air quality.
What a mold inspection covers and when you need testing
A mold inspection focuses on finding moisture sources and visible mold growth through visual assessment. Testing involves collecting samples to identify specific mold types and concentrations in the air or on surfaces.
Early signs you shouldn't ignore at home
Homeowners should watch for several warning signs that indicate a need for professional mold inspection. Musty odors often signal hidden mold growth behind walls or under floors. These smells become stronger in humid conditions or after rain.
Water damage marks on ceilings, walls, or floors show moisture problems. Brown or yellow stains indicate water has been present long enough for mold to start growing. Fresh water damage needs quick attention to prevent mold.
Health symptoms in family members can point to mold issues. Sneezing, coughing, or breathing problems that get worse at home may indicate mold exposure. People with allergies often notice symptoms first.
Visible discoloration on surfaces needs immediate attention. Black, green, or white spots on walls, ceilings, or around windows show active mold growth. Wood surfaces may show dark staining or soft spots from moisture damage.
Mold inspection and testing: when you need both
A mold inspection involves visual assessment and moisture detection without laboratory analysis. Inspectors look for water sources, humidity problems, and visible mold growth. This process identifies problem areas and moisture sources.
Mold testing collects air, surface, and bulk samples for laboratory analysis. Testing identifies specific mold species and measures spore concentrations in different areas. This process costs more but provides detailed information about mold types.
Homeowners need both services when health symptoms occur without visible mold. Hidden mold behind walls or under floors requires testing to confirm presence and identify species. Insurance claims often require test results as proof of mold damage.
Properties with previous water damage benefit from combined inspection and testing. Testing confirms whether remediation worked properly. New home purchases may need both services to identify hidden problems before closing.
Rooms and surfaces pros check first for hidden growth
Professional inspectors start with moisture-prone areas where mold grows most easily. Bathrooms, kitchens, and laundry rooms get close attention due to high humidity levels. Basements and crawl spaces face inspection because they trap moisture.
HVAC systems receive thorough examination since they spread mold spores throughout homes. Inspectors check air ducts, filters, and condensation pans for growth. Window units and central air systems both need regular inspection.
Hidden surfaces require special attention during professional inspections. Areas behind toilets, under sinks, and around water heaters often hide mold growth. Inspectors use moisture meters to detect problems inside walls.
Attic spaces face inspection because roof leaks create perfect mold conditions. Inspectors look for water stains, insulation damage, and ventilation problems. Poor attic ventilation traps moisture and promotes mold growth throughout the structure.
Step-by-step: What happens during a mold inspection
The U.S. Environmental Protection Agency states that mold will usually not grow if damp materials are dried within 24 to 48 hours.
Professional mold inspectors use specific techniques to find moisture problems and test for mold presence. They document everything with photos and detailed notes to create a clear action plan.
Moisture checks, air samples, and surface swabs explained
Inspectors start by measuring moisture levels in walls, floors, and ceilings using digital meters. These tools detect wet areas where mold likes to grow. High moisture readings show problem spots that need attention.
Air sampling collects mold spores floating in the room. The inspector uses a special pump to pull air through a collection device. This sample goes to a lab to count spore levels.
Surface swabs test visible spots that look like mold. The inspector rubs a sterile swab on the suspicious area. Labs analyze these swabs to confirm if mold is present.
Sample Type
What It Tests
Time to Get Results
Air samples
Spores in air
2-3 days
Surface swabs
Visible growth
2-3 days
Moisture readings
Water content
Instant
The inspector also checks humidity levels with digital gauges. Normal indoor humidity should stay between 30-50 percent.
Tools that find hidden leaks without opening walls
Thermal cameras show temperature differences behind walls and ceilings. Cold spots often mean water damage or leaks. These cameras create color images that reveal problem areas.
Moisture meters have long probes that go into walls without making big holes. They measure water content in wood and drywall. High readings mean water problems exist.
Borescopes are tiny cameras on flexible tubes. Inspectors push them through small holes to see inside walls. They can spot mold growth and water damage in hidden spaces.
Electronic leak detectors find water movement behind surfaces. They use sensors to detect moisture that human eyes cannot see. These tools work even when materials look dry on the outside.
How findings are documented so next steps are clear
Inspectors take detailed photos of all problem areas. They mark each photo with location details and moisture readings. These pictures become part of the final report.
Written reports list every finding with specific locations. They include moisture levels, sample results, and recommended actions. Reports explain which areas need immediate attention.
Site maps show exactly where problems exist in the building. Inspectors mark moisture spots, sample locations, and damaged areas. These maps help contractors know where to work.
Lab results get attached to the report when they arrive. They show mold types and spore counts found in samples. This data helps determine how serious the problem is.
Mold inspection cost and timing
Mold inspection costs typically range from $300 to $800 for most homes, with timing from initial visit to final results spanning 3-7 business days. Understanding what drives these costs and timelines helps homeowners budget properly and avoid duplicate charges.
According to HomeAdvisor, most U.S. homeowners spend between $303 and $1,044 for a professional mold inspection, with an average cost of around $670.
What drives price and what's usually included
Property size is the biggest cost factor for mold inspections. Most companies charge between $0.50 to $2.00 per square foot.
A 2,000 square foot home usually costs $400-600 to inspect. Larger homes over 4,000 square feet can reach $1,000 or more.
The number of samples needed also affects price. Visual inspections cost less than air sampling or surface testing.
Standard inspection packages typically include:
- Visual examination of all accessible areas
- Moisture readings with specialized meters
- 2-3 air samples from different rooms
- Basic written report with findings
Extra services that increase costs include crawl space inspection, attic access, wall cavity testing, and rush processing fees. Some companies charge additional fees for travel beyond their service area.
The inspector's experience level impacts pricing too. Certified professionals with advanced equipment charge more than basic services.
Typical timelines from visit to lab results
Most mold inspections take 2-4 hours to complete on-site. The inspector needs time to examine all areas thoroughly and collect samples.
Lab processing adds 2-5 business days after the visit. Air samples require laboratory analysis to identify mold types and spore counts.
Timeline breakdown:
- Day 1: Initial inspection and sample collection
- Days 2-3: Samples transported to laboratory
- Days 4-6: Lab analysis and testing
- Day 7: Final report delivery
Rush processing is available from some labs for an extra $50-100 fee. This can reduce lab time to 24-48 hours.
Weather delays can extend timelines during busy seasons. Spring and fall are peak times when labs process more samples.
How to avoid paying twice for the same work
Get detailed quotes before starting any inspection work. Ask what specific areas will be examined and how many samples are included.
Some companies offer low initial prices but add charges for each additional sample or room. Others provide flat-rate pricing that covers the entire property.
Red flags that signal potential extra charges:
- Vague pricing estimates
- Per-sample fees not disclosed upfront
- Separate charges for basic equipment use
- Travel fees not mentioned initially
Choose companies that include re-inspection within 30 days if initial results are unclear. This prevents paying for duplicate testing.
Ask if the inspection covers both visual examination and air sampling. Some basic inspections only include visual checks.
What reputable mold inspection companies include in their fee
Professional mold inspection companies should provide comprehensive service packages without hidden costs. The base fee typically covers all necessary equipment and basic testing.
Quality companies include:
- Moisture meters and thermal imaging cameras
- Professional-grade air sampling pumps
- Chain of custody documentation for samples
- Detailed written reports with photos
- Follow-up consultation to explain results
Certified inspectors often include recommendations for remediation if mold is found. They should not perform both inspection and cleanup services due to conflict of interest.
Many reputable companies guarantee their work and offer callbacks if questions arise about the report. Some provide limited warranties on their findings.
Look for companies that use independent laboratories rather than in-house testing. This ensures unbiased results and higher accuracy.
Can you do a mold inspection yourself?
Homeowners can perform basic mold checks using simple visual inspections and test kits, but DIY methods have clear limits. Professional inspections become necessary when health concerns arise or when buying property.
Safe DIY checks before you call a pro
Visual inspection is the first step in any DIY mold check. Homeowners should look for dark spots, discoloration, or fuzzy growth on walls, ceilings, and floors. They need to check areas where moisture collects often.
Common problem areas include:
- Bathrooms around tubs and showers
- Basements and crawl spaces
- Areas near leaky pipes
- Around windows with condensation
- Behind appliances like washing machines
Home mold test kits are available at hardware stores and online. These kits can detect mold spores in the air or on surfaces. The person using the kit follows simple instructions to collect samples.
Most test kits work in two ways. Air testing kits collect spores from the air. Surface testing kits take samples from specific spots where mold might be growing.
Safety comes first during any DIY inspection. People should wear gloves and masks when checking for mold. They should avoid disturbing large areas of suspected mold growth.
Mistakes that throw off mold testing results
Timing affects test results in major ways. Running air conditioning or heating systems during testing can spread spores around the house. This gives false readings about where mold actually grows.
Weather conditions also change results. High humidity days make spore counts go up naturally. Windy days can bring outdoor spores inside and confuse the test.
Common testing errors include:
- Testing during or right after rain
- Using fans or air systems during collection
- Testing in only one room of the house
- Not following kit instructions exactly
Sample collection technique matters a lot. People often take samples from the wrong spots or use poor collection methods. They might not seal samples properly or wait too long to send them to labs.
DIY test kits cannot tell the difference between harmful and harmless mold types. They also cannot measure how much exposure might affect health. The kits just show if mold exists in that spot.
When bringing in a specialist makes more sense
Health symptoms make professional help necessary. People experiencing coughing, sneezing, or skin problems should get expert testing. DIY kits cannot assess health risks or toxicity levels.
Property transactions require professional mold inspections. Buyers and sellers need certified reports for legal protection. Home inspectors look for mold during standard property checks.
Situations requiring professionals:
- Buying or selling a home
- After major water damage
- When family members have health issues
- Large areas of suspected mold growth
- Insurance claims related to mold
Certified specialists have better tools than home test kits. They use moisture meters, thermal cameras, and air sampling equipment. Industrial hygienists can identify specific mold types and measure exposure levels.
Professional inspectors know where to look for hidden mold growth. They check inside walls, under flooring, and in HVAC systems. These areas are hard for homeowners to reach safely.
Specialists provide detailed reports with remediation plans. They explain what types of mold exist and how serious the problem is. This information helps homeowners make smart cleanup decisions.
After the inspection: removal and prevention
A successful mold inspection creates the roadmap for effective remediation and long-term prevention. The findings guide targeted removal efforts and help establish moisture control systems that prevent future growth.
Turning results into a focused mold removal plan
The inspection report becomes the blueprint for mold removal. It identifies the specific type of mold, the extent of contamination, and the underlying moisture sources that need attention.
Professional remediation teams use this data to determine containment methods. Small areas under 10 square feet may only need basic precautions. Larger infestations require full containment with plastic sheeting and negative air pressure.
The removal plan addresses each contaminated material differently. Non-porous surfaces like glass or metal can often be cleaned with antimicrobial solutions. Porous materials like drywall or carpet usually require complete removal and disposal.
Air filtration systems run during the process to capture airborne spores. Workers wear protective equipment including respirators and disposable suits to prevent exposure.
The plan also includes post-remediation testing. This confirms that mold levels have returned to normal and the removal was successful.
Moisture control tips that keep mold from returning
Controlling moisture is the most important step in preventing mold regrowth. Mold needs water to survive, so eliminating moisture sources stops future problems.
Indoor humidity should stay between 30-50%. Dehumidifiers help in basements and other damp areas. Exhaust fans in bathrooms and kitchens remove moisture from daily activities.
Fix water leaks immediately when they occur. Check pipes, roofs, and windows regularly for signs of water damage. Replace damaged caulking around tubs and showers.
Improve ventilation in problem areas. Open windows when weather permits. Use fans to move air in stuffy spaces like closets or attics.
Clean gutters and downspouts twice per year. Water should flow away from the foundation. Grade soil so it slopes away from the house.
Ready for answers you can trust? Michaelis Corporation can handle mold inspection and testing
Professional mold inspection requires specialized training and equipment that most homeowners don't have access to. Certified inspectors know where to look and how to interpret the results correctly.
Michaelis Corporation provides thorough mold testing services that identify problems before they become major issues. Their team uses advanced testing methods to detect hidden mold growth behind walls or under flooring.
The company offers both visual inspections and air quality testing. They provide detailed reports that explain the findings in clear language and recommend specific next steps.
Their certified professionals can also perform post-remediation testing. This confirms that mold removal was successful and indoor air quality has returned to safe levels.
Conclusion
A mold inspection protects your health and property. The process gives you clear facts about mold problems in your home.
Understanding the inspection helps you make smart choices. You know what to expect from start to finish. This knowledge reduces stress and helps you prepare.
Quick action saves money. Fixing mold problems early costs less than major repairs later. Small issues become big problems when ignored.
Professional inspectors use the right tools and training. They spot problems you might miss. Their reports give you a clear plan for next steps.
Prevention starts after the inspection. Fix leaks quickly and control moisture levels. Use fans in damp areas and check problem spots regularly.
The inspection gives you peace of mind. You know your home is safe or have a plan to fix problems. Either way, you can protect your family's health.
Document everything and follow the inspector's advice. Keep your report for future reference. Share it with contractors if you need repairs.
A mold inspection is a smart investment in your home and health.
Suspect hidden mold? Book a certified mold inspection today to protect your home and your health. Fast action now prevents costly repairs later.

.avif)